Do It Yourself Wood Conditioner For Low Toxic Living

Wooden cutting boards and wooden utensils are essential tools in my kitchen. Having many wooden cooking utensils comes with the need of making sure they last as long as possible. The best way to make sure they last is to make sure they stay conditioned through all the use and washing cutting boards and utensils go through. Using a good wood conditioner will be your best friend in maintaining all your wooden products and tools.
What happens if wooden kitchen tools don’t get or maintain the moisture they need? They splinter, split and break. Because many people purchase and use wooden utensils and cutting boards for their longevity, it’s imperative to make sure they don’t leave splinters in your food or break when you need them.
Choosing wood conditioner ingredients
Since you are looking to make your own wood utensil conditioner, you may also highly prioritize knowing what your products are made of. To go along with that, making sure they include the best possible ingredients for your health and well being may also be important to you. With those two points, you may have noticed many wood cutting board and utensil conditioners/oils contain mineral oil. Although mineral oil is quick and effective for conditioning wood, it is made from petroleum oil.
Since wooden utensils and cutting boards touch a lot of food, it is important that you condition them with an edible and safe product. After doing much research along with some trial and error, I’ve come to the conclusion that I enjoy using a mixture of beeswax and coconut oil. Both of these ingredients are safe to be ingested due to their culinary uses.
Coconut Oil
In this day and age, coconut oil is a widely accepted ingredient in cooking, baking and skincare. Coconut oil is praised for the antimicrobial properties, soft texture and low melting point. Those characteristics make it an excellent addition to a cutting board and wooden utensils conditioner. You will find coconut oil at almost any grocery or convenience store. If you’re looking for an online resource for coconut oil, Azure Standard is a good resource.
Beeswax
Although beeswax is not a widely used culinary ingredient, it shows up in a fancy (well, fancy to me) pantry item called whole comb honey! I particularly enjoy whole comb honey as a sweet treat by spreading it on top buttered toast. So, although it’s not eaten in large amounts, it is definitely still edible. Along with it being edible, beeswax is antiallergenic, anti-inflammatory, antioxidant, antibacterial and germicidal. All of these beeswax properties make it an excellent ingredient for wood cutting board and wooden utensil conditioner. You will find beeswax at many farmers markets or craft and specialty stores. If you’re looking for an online resource for beeswax, Azure Standard and Etsy are good resources.
Ingredients and Tools
Beeswax – I like to use locally sourced wax so I know it’s processed less. If you don’t have a close location for it, etsy is a great option to find smaller producers.
Coconut oil – I use the same kind I cook and bake with but any kind will work well.
A double boiler – This is essential to make sure the beeswax and coconut doing the melting process
A heat source – I use a burner on my stovetop
A storage container – I use 4 oz canning jars because they are short and easy to use. They’re also the perfect size for gifting!
The Ratio
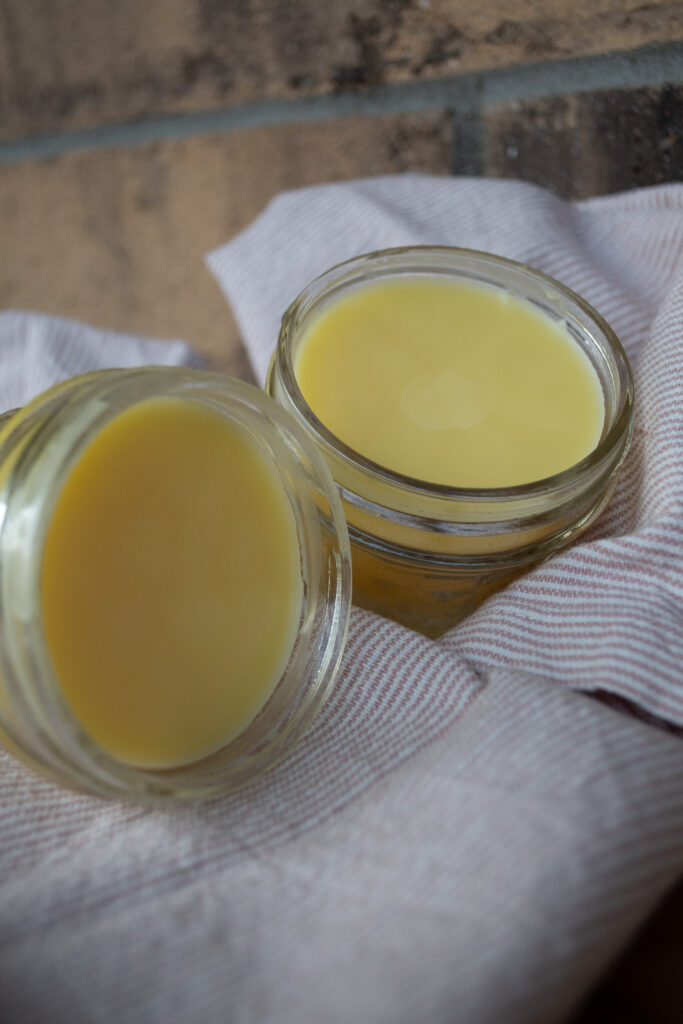
This recipe calls for one part beeswax & two parts coconut oil. However, the ratio of beeswax to coconut oil can be changed to your preference.
If you alter the ratio, it’s important to keep in mind that the beeswax will make the mixture more stiff and harder to spread while the coconut oil will make it softer and easier to spread.
Another aspect to keep in mind is that beeswax has a higher melting temperature than coconut oil. This means the higher the amount of beeswax in the mixture will make the conditioning more difficult to remove when washing in hot water. So, although the ratio of beeswax in this recipe makes it pretty stiff, it makes it so the conditioning lasts longer through multiple hot water washings.
Instructions
- Begin by adding water to the bottom of your double boiler and replacing the top to the double boiler.
- Add the double boiler to your heatsource at a medium heat.
- Add one part beeswax and two parts coconut oil to the top of the double boiler
- While maintaining a medium-low heat, occasionally stir until both beeswax and coconut oil are melted together.
- Once melted and well mixed, remove the top double boiler and wipe the moisture from the bottom of the pan.
- Pour beeswax and coconut oil mixture into desired storage container(s)
- Allow the beeswax mixture to fully cool before replacing the lid.
- Once fully cooled, seal tightly and store in a cool, dry place while not in use.

Tips in using wood conditioner
Step#1
Make sure your cutting boards or wooden utensils are clean and completely dry. If you wash them before conditioning, make sure they air dry for 24 hours to ensure all moisture has evaporated.
If moisture is still present when you apply conditioner, you run the risk of trapping the moisture under the conditioner which can contribute to mold and cracking within your board or utensils.
Looking for more DIY products? Try this Toxin Free Dry Shampoo Powder or this Herbal Elderberry Syrup.
Step #2
When you are sure your cutting boards and utensils are dry, you can begin applying the wood conditioner. You can use either your hands or a cloth to do this. Although using a cloth may be easier in spreading the conditioner, using your fingertips uses some body heat to help spread the conditioner.
If using your hands, warm up the board conditioner by rubbing your fingertips in a circular motion on the top layer of conditioner. Once some of the conditioner has accumulated on your fingers, rub your fingers on the cutting board or utensil to transfer the conditioner. Continue this process until all areas of your cutting board or utensils are conditioned.
If using a cloth, rub a section of the cloth in the wood conditioner. When you feel you have enough conditioner on your cloth, rub that same section of cloth onto the wood surface. Continue this process until all areas of your cutting board or utensils are conditioned.
Step #3
Once all areas of your cutting board or utensils are conditioned, allow it to sit and absorb the conditioner overnight. In my morning, take a new cloth and rub it over all surfaces to remove any excess conditioner.
Your wooden utensils and cutting boards are ready to use!
To maintain the integrity of your wood products, repeat this process when the wooden surfaces look or feel dry.
Did you try this at home? I’d love to know! Comment below or tag @missyshomestead on instagram.

